Mage-Ship
| Mage-Ship | |
|---|---|
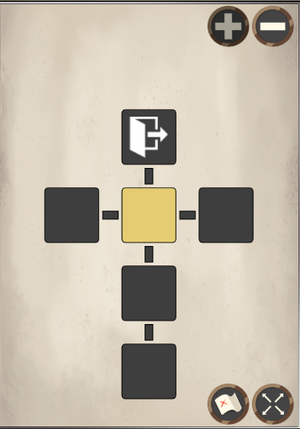
 Map of Mage-Ship | |
| Region | Glacial Rift |
| Level range | 5+ |
| Accessible from | Glacial Rift |
| Neutral Hub | No (see Mechanic) |
Hidden from where you are, you spy a shape emerging from the mist over the horizon, large yet sleek; the unmistakable silhouette of a ship. But this one isn't like any ship you've ever seen — bearing neither sails nor oars, it cuts through the icy water against the waves nevertheless, smashing through floating ice and debris with a reinforced hull to reach the cultists.
During Winter Wolf, you and Gweyr track down a ship being operated by the Demon Cult. Spying an open gunport, Gweyr uses grappling hooks to help hoist your group up into the ship. Your mission is to quietly explore the ship, gaining critical intelligence and resources for the next stage of the quest without being detected by the cultists.
"It's a Belharan warship. A destroyer, to be exact... These ships were part of the Belharan fleet that accosted my homeland. They were made to escort the heavier vessels... I also boarded one for this land to serve my task. I believe there are a couple specimens on display in museums in the capital... either way, Gweyr is right in that they do not move by oar or sail, but rather a curious device within the center of the ship that propels it through the water."
—Kiyoko
Writer Credit
Residents
Guest Companions
Mechanic
You only have so much time to explore the belowdecks of the cultist ship before the demons on deck smell a rat and come down to investigate. Having some resources and companions may help you save time; conversely, lacking resources and attempting to interact with the situations you find within the ship will likely take more time. You will likely not have long enough to go through every single interactable and come out ahead, so decide wisely as to where you should go and what you should do in order to find as many clues and discover as many resources as you can that will aid you in the inevitable confrontation to come.
The ship operates on a three strike system. Taking certain actions or failing checks leads to you incurring a Strike, and once you hit the third strike, you have to make your escape from the ship as the demons come below deck to investigate. Once the dungeon ends, you will not have another chance to access the Mage-Ship and access the rewards.
Points of Interest
Arbalest Deck
The deck where you slipped into the ship by, the side lined with gunports and braces for what in the past would have been a number of arbalests for firing upon other ships. Or at least, that's what the stories say... these days, the know-how required to put together crossbows, let alone those of such size, has been lost to much of the world. Some knowledge still lingers, for example in Khor'minos, but in the absence of weapons and the people to man them the deck's been converted into a makeshift cargo hold.
The Arbalest Deck is where you enter the ship, and where you can go to make your exit when you feel like you're done. However, there is no benefit to escaping the ship before you're forced to, so only do this if you're sure you've explored everything you want to.
- Leave: You've scoured the inside of the ship as best as you can or as much as you dare. Time to get out of here.
Crew Quarters
Mostly empty crew quarters, with only a couple of bunks showing signs of having been lived in. That there are actual bunks to begin with, and furniture beyond the couple of lockers here and there — old as the fittings may be, it really goes to show how ostentatious the Belharans could afford to be that they could give even their sea dogs comparative luxury even on a warship. There's a ladder and hatch here that leads up to the deck, firmly sealed shut — and a good thing, too, since you'll have plenty of warning should someone decide to make a sweep of the ship's interior.
South of the entrance, the Crew Quarters are the main intersection of the ship. There is a check here, as you and Gweyr try to silently knock out the sleeping cultists so they remain asleep during your infiltration. This check is unavoidable.
| Requirement | Result |
|---|---|
| Champion has >=70% Agility | Cultists successfully incapacitated |
| Etheryn in party | Cultists successfully incapacitated |
| None of the above | Cultist makes noise before being incapacitated, +1 Strike |
Cargo Hold
The ship's cargo hold proper. Unlike the arbalest deck, this space actually has goods in it — over half of which are empty barrels. The rest are wrapped up in hides in an attempt to waterproof them — you'll need to open them up to examine the contents. The lot is clearly the product of an organized mind, with barrels stacked, goods sorted, and plenty of room between each pile so that nothing spontaneously catches fire. You'd have thought that these were provisions and resupply for the cultist outpost, but that doesn't make sense; they'd have been unloaded earlier if that were the case.
West of the Crew Quarters. The Manifest in this room provide a hint for the Abyssal Depths, while there are Goods available to loot if you're quick enough to avoid taking too much time.
- Manifest: Maybe if you knew where all this stuff was coming from, you'd have an idea of what kind of resources Tollus has at his disposal.
- Goods: Inspect the ship's cargo.
- No: You're here to look for clues as to Tollus' activities, not engage in petty theft of common items.
- Yes: It can't hurt. Utilize the enemy's resources against him, as the great Macah strategist once wrote...
| Requirement | Result |
|---|---|
| Champion has >=70% Cunning | 5x Winterstem and 5x Brazenberry Ale looted |
| None of the above | 5x Winterstem and 5x Brazenberry Ale looted, but delay causes +1 Strike |
This space on the ship boasts a large, wood-grated window that lets what light there is pour in — not much at the moment thanks to the mist conjured up by the harpies, but still enough to see by. Maps, charts, and other navigational materials lie upon shelves, and there's a golden sextant upon the table — of course, upon further inspection, it's just bronze that has a very similar shade to that of gold...
East of the Crew Quarters. The Logs in this room provide another clue for the Abyssal Depths, while the Maps give general information on the cult's activities. Neither option risks causing a penalty.
- Logs: Maybe the ship's log might reveal something useful in where this ship's been and where it's going.
- Maps: The maps and star charts look pretty old. Are these even in use today?
Engine Room
The heart of the ship — a constantly thrumming abomination of pipes fashioned from some kind of silvery metal, the same color as that of Kasyrra's axe. The tubes snake away out from a glass-encased pedestal set in the middle of the chamber before disappearing into the wooden panelling of the room. Arcane symbols ring the dias on which the pedestal sits, and beginning to even try and comprehend what they mean is a flat no-go for you. Maybe someone else might know...
South of the Crew Quarters. The Pedestal offers an inviting mystery, as you've never encountered anything like whatever powers this ship before. However, allowing yourself to be drawn in like a moth to the flame could prove deadly...
- Pedestal: Examine the black orb on the pedestal as closely as you dare.
- No: This is too dangerous and you don't know if there's anything concrete you can get out of this. It's time to back away before you wind up doing something you'll regret.
- Yes: Getting closer to the ship's engine while it's running might be dangerous, but it might reveal something about what Tollus and his goons are capable of, if you have the knowledge to glean some insight from it. (causes +1 Strike)
Captain's Cabin
The captain's cabin of this ship — simply furnished, with the same mark of a tightly-run and orderly mind that's dominated the rest of the belowdecks you've explored so far. The wooden bed is perfectly made despite the slightly musky smell rising from the sheets implying that it's been slept in, no book is out of place on the standing desk in a corner, and if what you've seen of the ship so far has been clean, this cabin is absolutely spotless. Clearly someone obsessed with neatness, at any rate... which isn't necessarily a bad thing, but to this degree? The entire room is so perfect despite the constant rocking of the ship, it's unreal.
The farthest south room. Before you can enter, you're faced with a locked door. To access any of the resources within, you'll have to find a way past. Arona is not especially helpful in any of the following checks, but letting her 'stealth' the obstacles does lead to funny results.
- Yes: A lock means there's something on the other side of the lock that the owner thought was worth protecting. Let's see what you can do about getting in...
- No: This may be the end of the line, so you don't want to commit this early. You'll head on back when you're finished with examining the other rooms.
| Requirement | Result |
|---|---|
| Champion is Thief | Door opened quietly |
| Arona in party | Door opened loudly, causing +1 Strike |
| None of the above | Door opened loudly, causing +1 Strike |
Once you're in the room, you're faced with a number of options but (potentially) are running low on strikes. The Cupboard offers the greatest reward for the Abyssal Depths, although the Lockbox contains a unique item as well and the Liquor Cabinet looks tempting.
- Desk: There's not much here, but maybe...?
- Lockbox
- Yes
- No
- Liquor Cabinet: A drink couldn't hurt, could it?
- Easel: Someone has done... art?
- Cupboard: This ornate wall cupboard looks suspicious. Perhaps investigating further might be worth it.
| Requirement | Result |
|---|---|
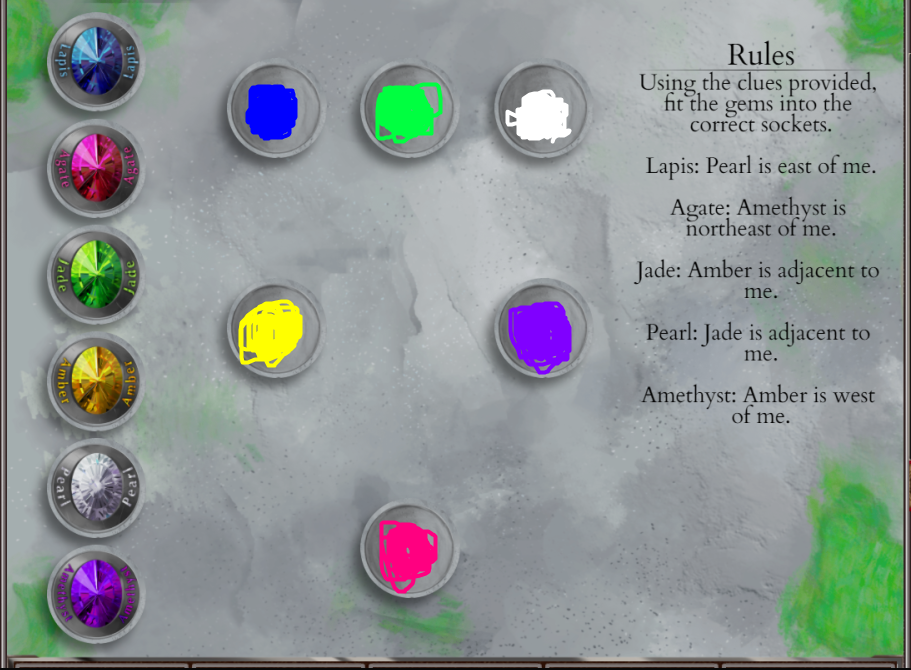
| Completing puzzle successfully | 1x Bone Seax |
| Choosing to Leave | Delay causes +1 Strike |
| Requirement | Result |
|---|---|
| Champion has Slum Rat background | Cabinet opened quietly, 1x Pupper Pale Ale, 2x Brazenberry Ale, 2x Ice Wine looted |
| Arona in party | Cabinet opened loudly, 1x Pupper Pale Ale, 2x Brazenberry Ale, 2x Ice Wine looted, +1 Strike |
| None of the above | Cabinet remains locked, +1 Strike |
| Requirement | Result |
|---|---|
| Champion is Thief or has Slum Rat background | Trap disarmed, cupboard opened safely, Avanai circlets looted |
| None of the above | Trap triggered, cupboard opened loudly, Avanai circlets looted, +1 Strike |
Gem Lock Puzzle
Quest Related
Winter Wolf
You access the ship during the Winter Wolf quest, and the information and resources you find aid you in tacking the Abyssal Depths.
