Difference between revisions of "Temple of Challenge"
Bluebird42 (talk | contribs) (Created page with "{{Infobox Quest | name = Temple of Challenge | otherName = ShorkDungeon | creator = SKoW | questGiver = Imora | requirements = Winter Wolf...") |
m |
||
| (16 intermediate revisions by 4 users not shown) | |||
| Line 1: | Line 1: | ||
| − | {{Infobox | + | {{Infobox Location |
| name = Temple of Challenge | | name = Temple of Challenge | ||
| + | | image = File:Temple of Challenge map.jpg | ||
| otherName = ShorkDungeon | | otherName = ShorkDungeon | ||
| creator = [[Author-SomeKindofWizard|SKoW]] | | creator = [[Author-SomeKindofWizard|SKoW]] | ||
| − | | | + | | accessibleFrom = [[Imora]] in [[Glacial Rift]] after completing [[Winter Wolf]] |
| − | |||
| levelRange = 5+ | | levelRange = 5+ | ||
| − | |||
| − | |||
| location = [[Glacial Rift]]<br>[[Starhome]] | | location = [[Glacial Rift]]<br>[[Starhome]] | ||
| − | | | + | | leadsTo = [[Starhome]] |
| − | | | + | | neutralHub = No |
}} | }} | ||
| + | This location is only accessible after finishing Winter Wolf and interacting with [[Imora]]. Once you clear it, you wont be able to return to it. Clearing it gives you access to [[Starhome]] from Imora's tile. | ||
| + | __TOC__ | ||
| − | |||
| − | == | + | ==Description== |
TODO | TODO | ||
| − | == | + | ==Points of Interest== |
| − | + | Resting point at entrance. <br> | |
| + | Pillar west of first door that can be collapsed (Strength check?) to open the door without getting a debuff <br> | ||
| + | Drum room with door to Jotun ghost room.<br> | ||
| + | Goop in Same room as door to Amethysta fight, heals with slight corruption increase. <br> | ||
| + | Cauldron before the last tile, Requires Viviane or mage pc to bypass traps. | ||
| − | == | + | ==Encounters== |
| − | + | Electric Eel - Right after entering<br> | |
| + | Jotun Giant-Father/Dad (silly mode)- After playing drums. Playing aggressively or wailing out adds 2 Jotun ghosts to the fight.<br> | ||
| + | Amethysta - Behind the door that tells you there is danger behind it. A semi-boss fight with time limit? | ||
| + | Pink Hydra: Final Boss of the dungeon.<br> | ||
| + | Losing any of the fights will lead to a bad end. | ||
| − | |||
| − | |||
| − | |||
| − | |||
| − | |||
| − | |||
| − | == | + | ==Loot== |
| − | + | 4600 EC from encounters <br> | |
| + | [[Horn of the Tides]]: if played drums aggresively. <br> | ||
| + | [[Giant's Breastplate]]: after beating Jotuns<br> | ||
| + | Battle-scarred Hook-dagger : After beating Amethysta | ||
| − | [[Category: | + | [[Category:Locations]] |
| − | [[Category: | + | [[Category:Dungeons]] |
| − | [[Category: | + | [[Category:Wiki page status - Outdated]] |
Latest revision as of 12:32, 19 February 2024
| Temple of Challenge | |
|---|---|
 | |
| Level range | 5+ |
| Accessible from | Imora in Glacial Rift after completing Winter Wolf |
| Leads to | Starhome |
| Neutral Hub | No |
This location is only accessible after finishing Winter Wolf and interacting with Imora. Once you clear it, you wont be able to return to it. Clearing it gives you access to Starhome from Imora's tile.
Description
TODO
Points of Interest
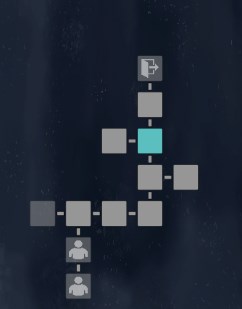
Resting point at entrance.
Pillar west of first door that can be collapsed (Strength check?) to open the door without getting a debuff
Drum room with door to Jotun ghost room.
Goop in Same room as door to Amethysta fight, heals with slight corruption increase.
Cauldron before the last tile, Requires Viviane or mage pc to bypass traps.
Encounters
Electric Eel - Right after entering
Jotun Giant-Father/Dad (silly mode)- After playing drums. Playing aggressively or wailing out adds 2 Jotun ghosts to the fight.
Amethysta - Behind the door that tells you there is danger behind it. A semi-boss fight with time limit?
Pink Hydra: Final Boss of the dungeon.
Losing any of the fights will lead to a bad end.
Loot
4600 EC from encounters
Horn of the Tides: if played drums aggresively.
Giant's Breastplate: after beating Jotuns
Battle-scarred Hook-dagger : After beating Amethysta